Monday, July 26, 2010

Bloom Pillow

This pillow is the hardest of the three ( I think?!?)  for my daughters custom bedding so, I started on it first. I cut tons of circles out of a soft fleece. I know you could use felt but, they didn't have it in the right pink color so, I changed my original plan. It worked out better because it's softer and my daughter LOVES soft things.
You start with the outside ring of half circles and sew them down. You add a row and pin them where they need to go and you just have to simply sew them down. You keep continuing until you get to the middle.
I had to use A LOT of circles. The larger circles are 3 1/2 inches and the smaller circles are 2 1/2 inches. Once you cut them all out you just cut them in half to create the petals. Easy! I only had to cut out 30-40 large and 20-30 small....kind of a wide range but, I lost count, Imagine that! I cut out four circles at a time because I folded over my fabric twice. This made it go by pretty quickly!
I wanted to add a little bit of the hot pink color of her bed frame in the pillow so I made a fabric covered button for the center with a simple button covering kit from walmart. It was simple and added just a touch of hot pink. The fabric is vintage fabric...so fun!
The cording on the edges was done in the aqua color of her dresser. So, this definetely is custom bedding! The back I overlapped so it is removable and washable....LOVE that!
This is the first of three pillows for her bedding. I am working on the second pillow so it will be coming soon!
The background is a small pink pin-stripe. It is really hard to see the little pin-stripe detail in the picture but, it is so cute up close! I love this pillow and am excited to finish the others! Yeah...sew on!

Saturday, July 17, 2010

Antique Bed Frame

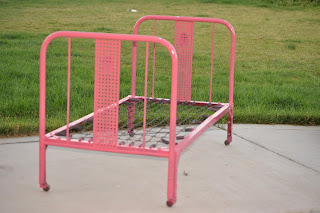
This cute antique metal bed frame was one of those things you see...and you can't get it out of your head. All the possibilities just kept popping up in my head and I knew it would be perfect for my house. 
It was red, which was super cute but, the wrong color for my daughter's bedroom. You will probably remember that I just finished her room but, we were planning on changing her to a twin bed soon. She got the hand me downs from the guest room(full size bed) from the other house and we have been meaning to get her a different bed.
I love the cute details of the bed!
My daughter was excited that this would be her bed and she is being my great little helper!
One of the details that I love was that the original color of the frame was aqua or teal. So, I wanted to keep all the cool chips of paint showing through. I took a candle and filled the chips with wax so the paint would come off easily. I wanted this detail to stay!
I love the metal emblem!
I love the hot pink color!
Now that the bed is painted...I need bedding. The only thing about this is it takes a unique size matress so, I won't be able to purchase anything off the shelf SOOOOOO....I get to custom make the bedding. I am actually excited because I can make it pink and white to match the room and do the cording(trim) in the aqua blue that I painted the dresser. This bed will be one-of-a-kind and it will be perfect for a growing girl. I know she won't be able to use this bed forever but, couldn't you see this as the cutest outdoor furniture! Oh, the possibilities! Seriously SO cute! 
I will post pictures of all the pillows (there will be three) and bedding (duvet cover) as I finish it peice-by-peice!

Friday, July 2, 2010

Boy's Airplane Room Reveal

Drum roll please.............
Are you ready......I am finally ready to reveal the boy's airplane room. I love the simple layout and the color scheme. They bring a sense of sophistication without being too old for the little boys.
Here's the drapery rod that I painted with the left over paint from the boy's dressers.
I bought this cool looped rug and love it. It make this little space below the windows a great little reading area. The chairs are JUST short enough to clear the shutters when they open. Like, within a half inch clearance...TOO perfect!
Here's one of the dressers with the window hung and the "brother's" letters above. The antique/vintage desk was redone earlier this last year. You can look how I did that in a post from last year. Still LOVE IT!
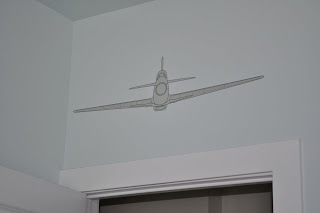
These are the cool plane decals. Sorry to say, I didn't make these by hand. I bought them...I know, I am in shock too but, when you find something this cool and it's already done....you buy it.
These decals were cool but had a few peices to match up because they were SO big, they came on seperate sheets. The wings came seperate from the body and so forth so it was fun peicing them together.
These are the "brother's" letters. I didn't have to change them at all. I guess I must have been starting this blue/black/gray theme before I even knew it was going to be the theme of the room. I feel bad that I started this room when we first moved in and I am finally getting around to finishing it. How's that for delayed decorating?
These bedding sets were SO cool, I had to buy them. They lived at Target before I brought these beauties home. I have never bought a bedding set before now. I have sewn my own, appliqued and even sewn quilts and this is the first time I have bought one. I love them though, not too baby boy and not too old. For buying my first set, not too shabby!
I love how I was able to buy a few peices then match it with custom made peices. It makes the room look pulled together but not matchy-matchy....you all know how I feel about that!
These cool club chairs I found on sale at Big Lots. I saw a pink polka dot one that got me in the store for my daughter but, once the boys saw these, they wanted one too. Good thing they were on a really great sale because I had to buy three!
View from the doorway.
The room seems so much more spacious since I moved the bunk beds to the east wall. There is so much more usable space this way and I love the layout! I hope you love it boys! It has taken me a while to finally finish it but, definetely worth the wait.

A room you can grow into for quite a few years and it not be too little boy because as you always tell me, "I HAVE TO GROW, MOM"!

Projects to finish the Boy's Airplane Room

Here's what I've been up to....projects to finish the boy's room!
Some items from the boys room just weren't working with the color scheme and needed a little more color. This old window had been filled with pictures of the boys together when they were little. I love the photos but, the gray/white color of the window wasn't adding anything to the black and white photos.
So, I used the paint color from the blue dressers to help the black and white photos stand out!
As soon as I got out my paint, my daughter got out her water colors. I guess someone might like being creative like me, YEAH!
This little quart of paint has been worth it's weight in gold. I am using it for all of the accent peices(dressers, drapery rod, corbals). This way I can have them match but, they are all unique peices which make them all different yet coordinating.
I had this drapery rod from a street find a few years ago. I am reusing it from the family room at the other house. I needed the holders but, must have left them at the other house. I found new ones for twelve dollars at hobby lobby but, didn't have a coupon so I just couldn't bring myself to buying them. I went to the local thrift store and found these beauties for a dollar a peice. Love a good deal!
A little paint and they are custom and ready to go!
The next thing was to hang the old window/picture frame and to re-hang the "brothers" letters.
Now, the only thing I have left to do is to apply the airplane decals. They are monochromatic and SUPER cool! I love that they are a theme that can work for little boys yet, they can grow into it until pre-teen years. It's definetely not baby and yet not TOO old. PERFECT! Now, on to the reveal!

LinkWithin

Related Posts with Thumbnails