Saturday, August 20, 2011

Library Card Catalog All Done!!!

I finished my library card catalog and am thrilled!! I am grinning from ear to ear! I've even heard a few squeals of excitement from myself after I got it into the house and stepped back to admire it! 

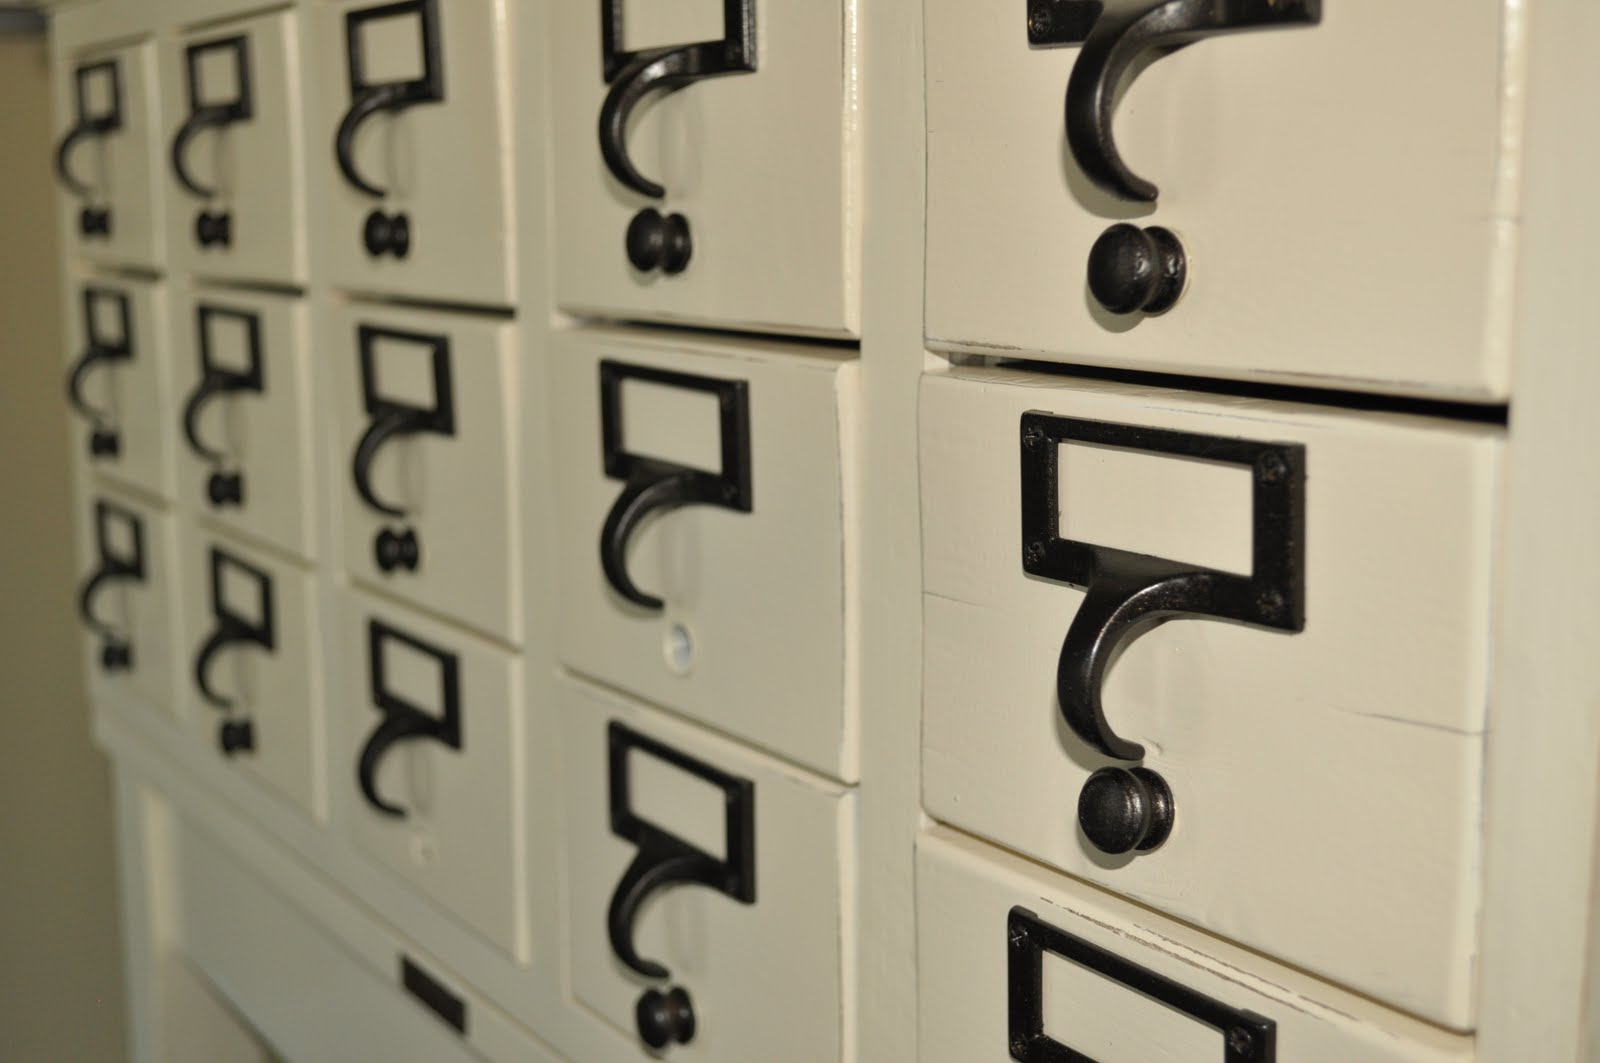
The hardware is black (actual oil rubbed bronze) so the hardware reads as black but, to have a slight bronze tint to it.
This picture shows the ever-so-slight sparkle of bronze in the black paint. 
It will be fun to label each drawer with a description. 
This is the original plaque on the front of the base cabinet. I taped it off to save it when I painted the cabinet.
It's a nod to it's origin. Syracuse, NY......I love the name of that city! Ha 
On each of the drawers I VERY LIGHTLY distressed the edges. I wanted to accent each drawer without being over the top distressed. 

Each of the drawers were lined to make them more functional (due to the slot that ran down the middle). 
Each drawer has a surprise bottom in it! 
Each drawer is ready to be filled! 

The drawers were lined with shelf liner. I found the black and white roll of Grip Prints was from Target. 
I measured the drawer width then cut (center and all) roll so I could cut the individual drawer lengths. 
The shelf liner has a gripper backing which makes it heavier and sturdier than contact paper. 
Drawers all lined and ready to go back in the cabinet. 

Remember....here is the before pictures again.
Great structure but, ready for a redo........
Here's the AFTER
I had my husband help me bring it inside once it was all sealed and I had him set in the living room so I could photograph it. I was loving it so much that when he asked if I was ready to have him help me take it to the studio(it's permanent home).....I just paused......kept looking......and decided I wanted it left in the room for a day so I could look at it all done. Ha Ha I love when I can laugh at myself (who else would want a library card catalog in their living room just for a day to look at....ha ha). It took so long to get done (longer than most projects) that I wanted it where I could see it all done.....at least for a little while. I still am SUPER excited to put it in my studio so I can give the kids toys their cupboard back (then I can get their toys organized better).
So, this is my library card catalog and I just LOVE it!! The original cabinet was rough when I started the project and took some work but, was totally worth it!!
Cassy Final

Thursday, August 18, 2011

YARD SALE


YARD SALE
YARD SALE
YARD SALE

It's time to clear out some of my projects and get some SPACE BACK!! I have known for a while I needed to do a yard sale but, was a little intimidated. I am finally ready to take it head-on!! I have projects that been moved to the basement when other newer projects take their place and now my basement is getting too full! I also have a few projects that came out of the store when I took a break (when we had our angel baby and next baby) and started doing projects just for me and some custom work. I also have projects that never got started so those are ready for you to take and do your magic on....or heck...I still take custom work...if you find a peice you love...I'll refinish it how you want it!!
So, I am ready to sell some stuff!!(Don't worry, those of you that gave me peices, I am keeping those) I listed on ksl (local classified) I've gotten some neighbors to yard sale with me so it's a whole cul-de-sac of fun!
So, it's official....I am doing a yard sale and getting some space back!!


Cassy Final

Library Card Catalog Part 3 of 4

Now we are ready for paint. I painted it an Heirloom White color by Rustoleum.
I am super picky about my technique with spray paint. I like the convenience of it in a can but, I want it SUPER perfect and I was SUPER(could I use another word???) excited that it came out great.
I painted the front inside edge but, not the entire inside. It's MDF and would have soaked up the paint.
The last bit of hardware was the rods that went down the center of each drawer to hold the metal sliding thing (real technical right?) that held the catalog cards. They are tension fit in the front of the drawer and I was happy about that but, I didn't need the rest of the rod down the middle of each drawer. So, I got my husband to cut them off for me.
He used his handle Dremel tool.....if you don't have one of these....you should....they are handy for tons of projects.
He had to rig it so he could use both hands to cut the metal rod. Yes, he was nice enough to scoot his car fixing tools to the side so he could help me with my project for a few minutes. (I think he has the intake manifold off....don't really know what that means but, I guess it means progress on his project?) 
He used a bungy cord around his workshops drawer, hooking it from one side of the drawer, underneath and then back to the other side to hold the cutter end of the Dremel. Pretty ingenious!!
Clever huh? Yep, that's why I married him!! LOL Okay, there were other reasons too!!
Here is the drawer rods ready to be cut off.
I am glad he was the one to do this because the metal cutting made some noise and sparks were flying. I might have been a little nervous to do this myself. Happy to be behind the camera taking pictures while he helped me out with my project.
Here's them all cut off....and yes, that is me covered in paint....typical!!! Ha Ha
This is the finish I decided to use but, it was so warm that it dried quickly. I had to put three coats on the top of the card catalog(with sandings between) before I was happy with the finished product. It just dried so fast that there wasn't a whole lot of time to fix imperfections and since I can be a perfectionist sometimes...it got done not once, twice but, three times. I guess that makes for an extra protected top....which is good since I am building a cupboard for my printer's drawers to go on top of this.
This is the drawer fronts with their poly.....ready to dry and have their hardware put back on.
This is the cupboard with it's polycrylic sealer on it.
The knobs all cut off and ready to be tension fitted back in the drawer fronts.
Each of the drawers and wood fronts I numbered. I knew with old cupboards that some drawers might have gotten used more than others and I wanted it to all fit together after all the hard work I'd done so, I numbered everything. I painted the top of the inside of each drawer but, left the bottom (where it connected with the drawer) un-painted so I could see what number I labeled it. So...I could put it all back together again!!
This is the first drawer front with it's hardware. It looks SO PRETTY...like icing on a beautiful cake!! Ha
Anyways, I can't wait to do the next post because it's the reveal!! Yeah....it turned out so pretty!!
Cassy Final

Friday, August 12, 2011

Library Card Catalog Part 2 of ???

Remember my library card catalog. It was in need of a little TLC. It needed a new front face and top...plus sanding, priming and painting. So, let's get started.


It needed a front face but, I had to scrape the wonderful yucky glue off of the front before I could attatch a new face front.
My wonderful neighbor has a wood shop and he let me use his shop to build the front face for my library card catalog and a whole new top from scratch. This is the catalog unit on it's side with it's new face frame.

The front face was glued and nail gunned onto the front of the catalog unit. I got the wood peices by planing down a peice of wood to the right width (about and inch thick) and then using a table saw to cut thin strips(about 3/8 inch) and cut for the right length for each of the front peices needed to make the front face.
Some of the inside parts of the library card catalog is MDF. I made the front out of a hard wood. You can see the original hardware in the background (gold) ready to be painted.

I sanded the sides and the front facing to get ready to be primed.
The legs had small fissure cracks and I filled those with wood filler then sanded and got the base ready to be primed and painted.
I used my sander to sand most of the table but, had to hand sand some of it.
This is my cute finger-eating helper. She sat and talked(I love the cooing stage) to me as I filled the catalogs legs with wood filler.  Then I got it painted when she took her afternoon nap.
I even routered the new top. This is the bottom side view of the top so I could show the routered job on the new top. It will be turned over and attatched to the top of the library card catalog.
Priming
The original hardware. Ready for metal paint. 
I painted the hardware black oil rubbed bronze with Rustoleum metal spray paint. I love the original hardware, it is really cool but, I just didn't like the gold color. So, it got a fresh coat of paint.
Each of the drawers were sanded and ready for primer.

I primed the bottom legs of the cabinet first then turned it over to prime and paint the rest.

Now ready for Paint....Yeah, my favorite part!!

LinkWithin

Related Posts with Thumbnails